5/6/14

Plywood & Paper.... Who Knew?

If you've been reading my blogs or following my Facebook posts for awhile, you know I love discovering innovative ideas for design and materials. This month I'll introduce you to new ways to think about using two basics... plywood and paper!
Plywood: One of my favorites lately is plywood. This versatile material is strong and relatively inexpensive. A standard workhorse in the building industry, plywood has a simple beauty that is justified to be highlighted in design.
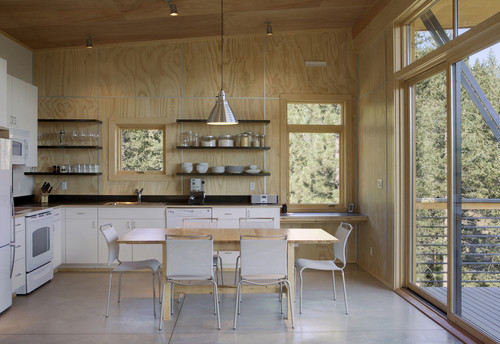
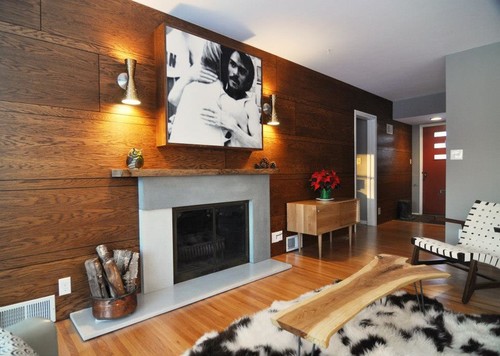
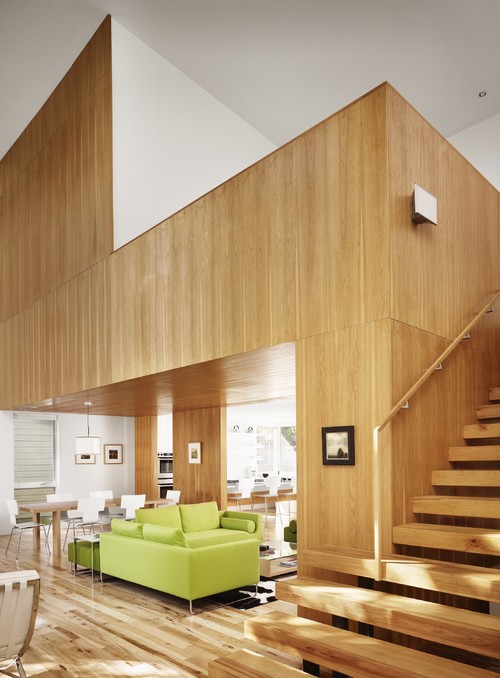
Here are a few examples I've found of plywood being used on ceilings and walls... who knew it could be so beautiful? These are from a project I found on Dezeen - click here to see more.


I found these on Houzz - so gorgeous!

Paper:  Would you consider paper as a viable choice when considering floor covering? Certainly not me! That is until I read about this blogger and how she used paper to create the illusion of wood plank floors.

A bloggist known as Freckle Face Girl, whose real first name is Chris, was invited by the website Remodelaholic to present a tutorial on how it was done. Chris, aka Freckle Face Girl, credits the origin of her idea to a floor she saw at Recyclart, showing a floor in Hawaii on which crumpled brown paper bags were pasted.
She took that a step further, using the builders paper cut into strips to simulate planks. The process detailed at Remodelaholic was to take the same heavy paper builders roll out to protect flooring as they work on home interiors, and paint it to look like wood plank flooring. It actually looks like distressed reclaimed wood plank flooring. 
Click here to find read Freckle Face Girl's paper flooring recipe (she also says she used real tacks for effect).

2/24/14

9 Tips for Creating Warmth at Home

During this exceptionally cold winter, it's challenging to find creative ways to bring in warmth and comfort into our homes - not only to help reduce our heating bills, but to make us all more comfortable.  Here are nine 'warmth & comfort' ideas for your kitchen and bath:


In the Kitchen:
1. Radiate warmth -  A few years ago, we wanted an island but there wasn't room for a radiator and I really dislike the forced air fans in the toe kicks because they are noisy and I didn't think it would be enough heat. We used a Runtal radiator wrapping the island instead & it looks great---basically flat--and it was really toasty to get up and sit at the island and read the paper with the heat right there!

2. Keep coffeemaker nearby - One way to create
comfort in your kitchen is to make things easy  and convenient... especially in the mornings while we're still waking up! One simple thing is to organize your morning routine into one area, for example, keep all of your coffee or tea making supplies nearby - filters, measuring spoons, coffee, tea, sweeteners, filters - all in one area.

3. Set back your thermostat electronically - Programming thermostats is complicated and irritating - but an un-programmed thermostat can waste 20% of your heating and cooling bill. So the Nest Thermostat programs itself. Just turn it up and turn it down. The Nest Thermostat learns what temperatures you like and builds a personalized schedule. Teach it efficient temperatures for a few days and, within a week, it'll start setting them on its own. https://nest.com/thermostat/life-with-nest-thermostat/.

4. Install an electronic dimmer switch - If you're a night owl, bright lights early in the morning can be a shock to your system and not a pleasant way to start the day.  Consider an electronic dimmer switch - it will adjust to your time schedule and slower raise the level of light each morning... giving  you time for your eyes (and your attitude) to adjust.

5. Keep clutter at bay - Cluttered kitchen counters can create stress, so find creative ways to keep clutter at bay to add comfort and alleviate stress on your busy mornings. Every kitchen has a "drop zone" where keys, purses, backpacks, mail and other paperwork lands.
  • Add dividers to drawers for specific items you use every day
  • Create a charging center for electronics with extra outlets

In the Bathroom: 

6. Install heated floors -  Stepping onto the warmth of a heated floor is an unexpected pleasure on a cold winter morning.  Consider adding radiant or hydronic heat to your bathroom floor:
  • Electric radiant heat is commonly installed in existing homes and uses heating cables within a mesh mat. This is best for specific rooms or spaces and in existing homes.
  • Hydronic heat is probably best for new construction. This type of flooring uses heated water that is distributed through a complex tubing system. For more information see http://www.wfca.org/Pages/Radiant-Heated-Floors.aspx
  • Electric heating can even be run under the floor of the shower.  Now that’s toasty. 
7. Take a fresh look at organization - The old adage "a place for everything & everything in its place" still holds true... especially when looking for peace and tranquility in the bathroom! I've designed drawers for clients specifically to fit their electric toothbrushes (who wants that mess on the counter?) and placed outlets inside drawers for daily straightener or curling iron use. Think about your storage in new ways... how could you make your bathroom space more efficient?

8. Try heated copper towel bars - Now, why didn't I think of that? An innovative solution - hot water runs through these copper pipes... warming the towels while you shower!

9. Relax.  Light some candles and set out your warm slippers, soft robe, and plush towels so they are ready for you after a bath or shower - a little pampering at the end of a long day can help you sleep more soundly and melt away stress.

12/17/13

Creating the look of Copper Patina

Patina (pəˈtiːnə):  a weathering formed on the surface of copper, bronze and similar metals.

I love the look of copper- especially when it has a beautiful green patina. We recently installed these pieces at The 128 Cafe - I love how the colors change depending on the time of day and the amount of light coming in the restaurant!
After the holidays, I'm going to paint the duct in the front room with a metallic paint that has another layer that goes on top and supposedly will patina it when applied. That is a project for January - I will let you know how it works out!
 
Raw copper will naturally patina over time, but here's an easy formula to speed up the process. You'll need:
  • 2 cups white vinegar
  • 1 1/2 cups non-detergent ammonia
  • 1/2 cup non-iodized salt
  • Mix solution in a plastic spray bottle until salt dissolves 

Preparation:
  • Spread newspaper in your work area
  • Clean your piece with a Windex-type cleaner.
  • Premix patina solution in Windex-type spray bottle

(Please use CAUTION when handing and applying patina solution. Wear gloves and safety glasses, and follow safety instructions on the containers.)

Application:
  • Spray Windex cleaner on piece to break surface tension, leaving it on when you apply patina solution.
  • Spray patina solution onto piece

Wait.
  • Allow to set for 1 hour. 
  • Reapply solution where needed after seeing results of first application. 
  • If there seems to be areas repelling the patina solution, clean it off with the Windex cleaner.

More waiting....
Allow to sit overnight.

Finally:
The result will be a bright green powdery patina! Do not rub off. In time (and re-applications) this finish will become permanent and the brightness will fade with time.

To reduce green, cut back on the salt content. Color and effect is greatly affected by application ambient temperature and humidity. Enjoy!

10/1/13

128 Cafe - Our New Adventure!


We are excited that our son Max is the new Chef Owner of 128 Cafe in St. Paul. 

It will be a bit of a family affair---John, who is retiring from his 35 year career, will be the financial person and I will be the facility person. 

It will take us some months to make changes to both the restaurant itself and the menu, but I'll keep you posted. 


Recently Max served from the 128 food truck at the Julkowski, Inc. open house in Roseville - it was a fun night!


9/6/13

3D Printing... A new way to 'Cook'?

I've been intrigued lately by 3-D printing - have you heard about it? It's pretty incredible and opens up a whole new range of options for us as designers. Very simply, these printers build a three-dimensional object by adding successive layers of material millions of times over according to a digital blueprint, creating all sorts of objects for use in design, construction, decor...the list keeps growing as fast as its popularity. But this option is perfect for me, because it combines two of my favorites: design and food!
Shoeburger: As part of a contest, the bun for this burger was baked in a shoe-shaped pan that the entrant created on his 3D printer. (via Shapeways)
Gummy People: Move over bears, worms, and fruit shapes, the new way to get your gummy-candy fix is by printing a 3D version of your own body. We’re thinking these would make great birthday party or wedding favors in the shapes of the guests of honor. (via dvice)
Pasta: This is still a prototype, but imagine all the pasta shapes you could be enjoying once this printer becomes a reality!  What shape would you make first? (via Inhabitat)
Chocolate Printer: This chocolate printer, the Choc Creator V1, is available for just over $4,400.  You can create chocolate treats in any shape imaginable - consider the possibilities! (via Choc Edge)

Nasa is getting into the mix too... it has funded research for a 3D printer that creates entrees or desserts at the touch of a button. (This reminds me of a Star Trek episode...!) Texas-based Systems and Materials Research has been selected for a $125,000 grant from Nasa to develop a 3D printer that will create "nutritious and flavorful" food suitable for astronauts, according to the company's proposal. Using a "digital recipe", the printers will combine powders to produce food that has the structure and texture of, well, actual food.
Sources: The Guardian & Brit+Co

6/29/13

One-sort recycling: going in the right direction


This month recycling is top of mind because we were notified that we will switch to no-sort recycling. I'm excited about that because I think it will bring a lot more people into the recycling process who may not have done it before.  

This one-sort recycling means a change for kitchen design as well  - no need for separate containers for paper, glass, plastic etc.  Remember when we had to separate aluminum cans from tin/metal cans? We are moving in the right direction…

Buying products that are wrapped in PVC --you know, the ones you need a scissors to open and even then you can cut yourself on it--always irritates me because I have to throw the blister packs away.  I like to recycle whenever possible, but according to this article recycling this type of plastic if one quarter of one percent - that's hard to fathom. Here's more information I found on a website called www.earth911.com

Photo credit - Flickr - Incurable hippie
PVC (Polyvinyl chloride) is considered a difficult and expensive material to recycle. For this reason, much of it ends up in landfills.  

Where You’ll Find It:
  • Blister packs
  • Clamshell containers
  • Bags for bedding, medical shrink wrap, deli and meat wrap
  • Pipes, siding, window frames, fencing, decking and railing
Why They Use It: PVC is very strong and high-impact. Along with its brilliant clarity, plastic #3 is also resistant to grease, oil and chemicals.

The Lowdown on Recycling: PVC is not commonly recycled or recyclable, nor is it biodegradable. More than 7 billion pounds of PVC are thrown away in the U.S. annually, and only 18 million pounds – barely one-quarter of 1 percent – is recycled. The relatively new mechanical recycling process known as Vinyloop® technology, developed by Solvay Research & Technology, allows the complete separation of PVC material from the non-PVC materials that are often combined with it.

Need-to-Know Info:
1. PVC requires 20 percent less energy to produce than other plastics. It is also thought to save on fossil fuel use, as its principal raw material (nearly 60 percent) is chlorine-derived from common salt.
2. To make vinyl products flexible, controversial plasticizers known as phthalates are used, accounting for nearly 90 percent of total phthalate consumption. This translates into more than 5 million tons used for vinyl every year.
3. Energy-intensive chlorine production for PVC consumes an estimated 47 billion kilowatt hours per year – almost equal to the annual total output of eight medium-sized nuclear power plants.


5/31/13

Outdoor Inspirations for the start of SUMMER


This month, in celebration of sunshine finally appearing in Minnesota (!) and the unofficial start of summer, I'm sharing a few nature-inspired ideas for you - enjoy!

Bamboo garden design inspiration 


Wouldn't it be great fun to create a smaller version of this for your garden?


This impressive arched bamboo pavilion was created by a Brooklyn studio to raise awareness about a Taiwanese forest under siege. The Forest Pavilion has 11 vaults--each more than twice as tall as a basketball hoop--that soar wildly over a central meeting space in Hualien province, Taiwan. 


The pavillion is made out of bamboo, which, unlike trees, grows fast and can be harvested without harming the plant. The architect used freshly cut green bamboo, flexible enough to bend, and tied together with stainless steel wire. The bamboo was then inserted into steel pipes & welded.


The Forest Pavilion was conceived for an arts festival organized to promote preserving the landscape as a forest. “In recognition of the cultural diversity of the region, the pavilion’s vaults, each one presenting a unique ‘gateway’ into the meeting space, sought to formalize this diversity and suggest an opportunity for unity in support of a greater environmental benefit,” the architects said.


Can you believe these beautiful pieces are ceramic? 
Photo by Sylvain Deleu Copyright: Nuala O'Donovan


This Irish ceramic artist, Nuola O'Donovan, combines regular pattern with the characteristics of irregular patterns and forms found in nature. Each element of the pattern is individually made, the form is constructed slowly over a period of weeks or months. 
Photo by Sylvain Deleu Copyright: Nuala O'Donovan

According to her Artist Statement, the finished forms are 'a result of an intuitive response to the direction that the pattern takes as well as the irregularity in the handmade elements of the pattern.'


Photo by Sylvain Deleu Copyright: Nuala O'Donovan


"My decision to research patterns and forms from nature stemmed from my interest in the narrative quality of irregularities in patterns. The history behind a scarred or broken surface is what fascinates me," says the artist.